Saturday, November 10, 2012

Hmm, what's this?

Sneak preview of some exciting new developments in the Dirt Lab...


Friday, November 09, 2012

Taking it with you: A review of the Kiboko 22L camera bag

Iceland_0258
Gullfoss and Rainbow, Iceland Canon 7D 24mm Tilt-Shift Lens.

Photography is among my myriad interests, and I've managed to gather many different ways of carrying camera gear. One challenge is that much of my photography occurs while I'm out being a geologist, which means I've got to have space in my pack for a rock hammer, water, notes, sample bags, and other scientific sundries. This summer, me, my wife, and a couple of our good friends went on a three week vacation to Iceland and Scotland. I've shared a few pictures from the trip, but I've not really talked much about any particulars from the trip. Allow me then, to discuss the finer points of camera bags and travel from a geologist's perspective.

Over the years, I've used several smaller over-the-shoulder with a waist belt style bags. One I have now is a pretty decent design. It's roomy and I can toss my camera and a couple of lenses in there no problem. But to carry ALL THE THINGS, I needed a larger backpack style bag. I went so far as to pick up a used Lowe Mini-Trekker at one point, but the large access flap made it difficult to fish one particular item out without exposing the entire collection to the elements, or risk of spilling out of the bag. So I was really excited to see the design of the Kiboko 22L camera bag from Gura Gear had a butterfly style set of access flaps. Some people have found them awkward. I've found them invaluable.

So, a little bit about the bag itself. I went with the "22L+" size, which states, among other things that you can fit a whole bunch of stuff into the bag, including a 17" MacBook Pro. I didn't bring my 17" computer on the trip, but before I left I verified that yes, this giant surfboard of a computer does fit in the zipper slot behind the main bag. They also advertise room for 5 or 6 small-medium size lenses a camera flash, and a couple of camera bodies. Based on my experience, the advertised capacity for "stuff" is just about spot-on. Here's a more detailed review done by the Luminous Landscape photography blog - I don't really need to spell out features, you can read up on the architecture of the bag there.

Untitled

Untitled
This is how the camera bag looked the day before we left. When I got to the check-in counter at the airport, my bag was 12 kg - 2 kg over their bag limit. So I grabbed a lens and camera body and tossed them in my coat, which I was wearing at the time. That took off about 3 kg from the bag. I then took the bag off the scale, walked over to the security line and put the body and lens back in the bag. They made the rule...

Taking in the view at Reykjavik Harbor (photo by Kelly McCullough).

Iceland_0030
Thingvelier, Iceland

Scotland_1030
Stones of Stenness, Mainland Orkney Scotland.

Here's an interesting anecdote about the design of the bags: I was photographing fulmars and guillemots on Mainland Orkney and completely engrossed in the view, when I stopped to take my bag off my shoulders and set it on the ground, I discovered that I hadn't zipped the main flaps. So here I was, traipsing across 100-foot cliffs and bare rock with a completely unzipped camera bag! But thanks to the design, nothing fell out. The flaps stayed shut. I might have saved myself several times the cost of the bag in terms of lens repair/replacement with that stunt alone. Lesson learned. The positioning of the zipper pulls makes it easy enough to verify things are closed.


Atop Arthur's Seat, Edinburgh Scotland (photo by Kelly McCullough)


Glasgow_2992
Necropolis, Glasgow Scotland

On the Royal Mile, Edinburgh Scotland (photo by Kelly McCullough)

The camera bag held up very well, allowing me to lug about 12 kg (25 lbs) of equipment around the hard cobblestone streets of Edinburgh for about six hours without getting too tired. Plus there was plenty of room to stick a water bottle and some snacks to keep going.

Tilt-Shift Edinburgh

Squeezing up the stairs on the Scott Monument, Edinburgh Scotland (photo by Kelly McCullough)

It's rather big - which is great for holding gear, but made navigating tight paths a little challenging. I had to learn that I was skinnier facing forwards than sideways when I had the Kiboko on my shoulders. But the bag comfortably fit into the overhead compartment of the IcelandAir 757. I even had a short moment to check to see if it would fit underneath the seat in front of me. I was able to stash it under there, but this wouldn't likely work on airlines with less room beneath the seats.

As far as science goes, this bag is something that isn't good for carrying messy gear - all the little pockets and folds are liable to trap grit and things which would be bad for cameras and other electronics. But there's plenty of room for stashing a few well-sealed samples - the adjustable compartments make it easy to stash away a chunk of basalt or ammonite fossil, without the rocks mashing into the more fragile lenses.

Basically, it's been worth it for me. This thing isn't cheap. But if you've got a few thousand dollars worth of photo equipment (giga pans, anyone?), it's a very useful item. You can carry a tripod on the side, or bungie it to the top handle and carry it strapped to the center of the back (where it would be less off-center). Plus you've got an iPad, or laptop carrying pocket built-in. My verdict: probably not what I'm going to bring along when I'm doing grungy fieldwork - at least, I'll leave it in the van while I'm digging, then bring it out for the slightly less dirty aspects of exploration and photography. Just the kind of thing for a trip to northern Europe in the summer...

SkyePanoLG
Panoramic view from the Quirang, Isle of Skye

Thursday, November 08, 2012

Mounting Cameras to view the Em2

Here's a helpful suggestion. Two really. Many of us with the Em-series stream tables, or other linear physical model often want to take time lapse photos of the stream table. To do this, you set up your camera and take a bunch of images in a sequence and then link the images together into a movie. I've also been using the X-Box Kinect sensor to make 3D scans of the Em2 - a setup that also requires a good, stable view of the stream table.

8-16Run01Kinect from Matt Kuchta on Vimeo.

7-16 Em2 run, 3D KinectData from Matt Kuchta on Vimeo.

How do you mount the camera so that it is both stable and oriented to get the best view?

First, you can use a tripod. In general this works rather well, but the camera is going to be elevated and looking down on the stream table at an angle, which is a particularly big problem with tripods that come with a fixed central column. This might look okay in a time lapse video, but is unacceptable for 3D scanning, since one edge of your picture is going to be very close to the scene and the other edge is going to be over 2m away from it.

Tripods with a repositionable central column are a much better option, since you can cantilever the center column out over the table and get closer to a top-down view, making the edges of the scene more equidistant. The resulting side-effect, though, is you lose subject distance and must go with a wider angle lens, introducing the potential for greater distortion. I use both a Gitzo carbon-fiber tripod and a Manfrotto aluminum tripod (something similar at B&H photo here) for time lapse work. I've also found it acceptable for the Kinect, since I don't need to be as far away from the stream table to keep the sensor within 1m of the subject. I went with a high-end carbon fiber tripod since I do a lot of hiking and nature photography, so if you're just doing studio work, it's overkill, but I am absolutely in love with my CF Gitzo 'pod. Links are to B&H items because their product search feature is the more customer friendly of the batch, but you can find similar items at Adorama, Hunts, Amazon, or at your local camera shop. The tripods they sell at places like Wal-Mart and Best Buy trend to the short, cheap and useless end of the product spectrum.

Here I've got the carbon fiber tripod holding the camera and the aluminum tripod holding the Kinect sensor. Both tripods are equipped with a ballhead - another handy item, since you get nearly full 3-axis movement for adjustments.

A second option, and one that I'm going to switch to, is using a C-stand (C for century). These things are a little bit more robust and their construction and design allows you to cantilever items much further out than the tripods center column. It'll need to be stabilized with some weights at its base, but I think the smaller footprint and further reach will quickly endear itself to this process.

Tuesday, November 06, 2012

How many ping pong balls in a cubic foot?

About 475 as it turns out...

The Em2 and 3D Scanning: a few lessons learned

It's election day here in the USofA. I voted early, because my wife and I have busy teaching days on Tuesday - not having to then march over to the polling station and wait in what should be a long line is a greatly appreciated luxury that living in a rather democratically progressive state (for now) provides.

If you haven't voted yet and are able, please do so. If it's against my candidate of choice I hope that the results at least provide clarity of purpose in ways that allow us to work together. If it helps my candidates of choice, good on you.

Last night I posted some pictures of using the Kinect scanner for 3D imaging of the Em2 stream table. In general I have to say there are a couple things that are absolutely fabulous, and a couple things that are really frustrating about this technology.

First the frustrating things:

1) Accuracy and Precision:
To be specific, the overall accuracy is quite good. That is to say if the sensor thinks an object in front of it is 75 cm away from the sensor, there's a good chance it is. There's not a lot of wildly varying values reported in most cases. Accuracy suffers when there's a lot of infrared noise, or the surface being scanned is very reflective. This is one of the reasons why I lined the base of the stream channel with a black rubber sheet - much less of a reflective "blind spot" in the middle of the scan.

Precision, however, is another story. The distance model the camera uses really changes beyond about 1 meter. The closest you can get to the scanned surface is about 0.3 meters and from there to about 1m, we've been able to pick up the presence of a single penny placed on a flat surface. Considering the D50 of the standard Em2 sediment is about 0.5mm, it doesn't take much deposition or erosion to show up in scans. Once you go beyond a meter, the precision drops to less than a centimeter. Not bad for rough 3D scans of rooms for robot navigation, but not terribly useful for the subtle changes produced on a stream table. We're looking into ways of data processing that might improve this. But being limited to a camera-subject distance of less than 1m leads me into the next frustrating thing.

2) Field of View:
At a distance of 1m, the field of view on the Kinect is somewhere around 90cm x 70 cm. The entire functional length of the Em2 is just under 2m. To get the entire stream table in the scan, we could pull the scanner back, but then the problem with precision pops up. We tried using a rolling frame, but we've had issues stitching the frames together and maintaining a common reference point. The latter issue is more of a computing process, but the distance problem appears to be something that creates a firm upper limit on the area a single scanner can reliably measure. An alternative is to get another Kinect scanner. Having two scanners locked down would probably work, but that's a problem that will have to be solved later.

But now the fabulous things:
1) Accuracy and Precision:
Within a meter's distance, we've been able to resolve individual pennies that were present in one scan, but removed in another. A single penny isn't much more than a millimeter in thickness, so getting high-resolution information of a 90 cm reach of stream is really exciting. Not only can you detect subtle changes in aggradation and erosion of the active channel, but you can observe and measure bank/valley wall collapse. Want to measure the contribution from mass wasting? We've got you covered. Want to measure the rate of floodplain aggradation based on sediment supply? There's an app for that, too :)

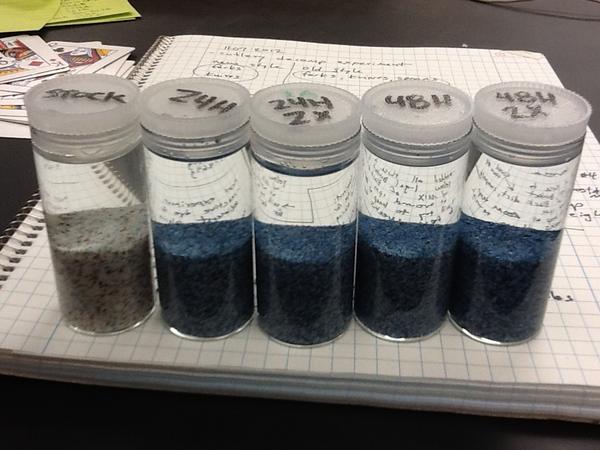
A comparison of two scans one before and the second at about 20 minutes into an experimental run. Green values represent changes that are closer to the camera (aggradation/deposition), red is further away (erosion). I've found that most of the sediment transport/depo that occurs in the first half hour is directly related to profile adjustment and smoothing out the small bumps that I introduced when smoothing out the sediment prior to the run.


The top image is the distance data obtained from the Kinect. Below is a view of the same setup (a little later in the run) showing where the stacks of pennies (1, 2, and 3 pennies tall) were added to the scene. They were added, so that spot appears closer to the camera. Yes, even with a bit of noise, you can tell if a single penny has been added or removed from the scene (at least if the scanner distance is within about 1m).

2) Speed and Detail:
The other great thing about the setup is the speed at which we collect data. To get enough distance information, we let the camera continually scan the scene for about 1 minute. Imagine how long it would take to get sub-centimeter resolution from a 90 cm long channel measuring by hand? Totally impractical. Not to mention your estimates of mass wasting would be much more difficult. Here, you can do cut/fill measurements over time scales that are quite useful.

Here's a complete sequence of a multi-hour run (click to embiggen). The time between scans varies from about 15 minutes to about 30 minutes. The experiment looked at simple incision of the main stream for the first couple hours, and then I turned on the valve for the tributary stream and let it run for another hour. I love the fact that you can see small-scale readjustments and intermediate stages of sediment storage/removal. Look closely at the 3D data - the little white foam blocks are 3mm tall and you can see when they've moved around. The picture's a little small to easily observe the pennies, but they do show up in a larger version (see example above).


I think our next step is to add a second Kinect to increase the scanned area and look into methods of making isopach or contour maps from the 3D data. Needless to say, I'm really excited about these preliminary results.

Of course all of this could not have been accomplished without the dedicated help of many other people. I want to give a tip of the internet hat to Steve at LRRD whose enthusiasm for table-size stream tables gave birth to the Em-series models in the first place. I also want to give props to my colleague Todd Zimmerman - a computer whiz who in the span of a couple days brought himself up to speed with the Kinect 3D data files to program ways of averaging large data sets and visualize the changes between individual scans. Incidentally, both Todd and I went to the same undergraduate institution (Lawrence University in Appleton, WI), so I guess I can forgive him for being a physicist ;). Without the dedicated work of my student researcher Bryn (also a Lawrence student), this project would have stalled out well before the sediment supply and constant head tank systems were built. She's the one who spent many hours monitoring the pump during some early experiments - and the one who most appreciated the constant head tanks and the speed/convenience of measuring via remote sensing. Finally, I have to give credit to the person who gave me the idea of installing the Kinect on an Em2 in the first place, Ken Mankoff - he's never heard of me, but he was more than happy to give Todd some suggestions on improving the Kinect data processing. Plus he's got a shiny publication that ought to turn the head of any tech-minded geoscientist considering using the Kinect in the lab OR in the field. Good stuff there.

Oh, and I've got a fantastic announcement to make after people get back from GSA this year. It's super-awesome and I hope it's a sign of really exciting things to come. :)


Monday, November 05, 2012

Hacking the Em2 Part the Fourth: 3D Scanning

Okay, here's the last post in a series on hacking the Em2. At least for now. Once I got all the modifications done to control discharge and sediment flux, I needed a way to measure the influence of all this stuff. The simplest way is to run up and down the channel with a ruler. But that's fairly time-intensive, particularly if you make measurements over short intervals.

Enter the X-Box Kinect sensor. It uses an IR laser pattern to measure distances. Over short (<1m a="a" amazing="amazing" by="by" can="can" changes.="changes." detect="detect" distances="distances" done="done" href="http://kenmankoff.com/2012/09/12/accepted-with-minor-revisions-the-kinect-a-low-cost-high-resolution-short-range-3d-camera" is="is" it="it" millimeter-scale="millimeter-scale" precision="precision" s="s" such="such" thanks="thanks" that="that" the="the" to="to" work="work" you="you">Ken Mankoff
, we had a working methodology to start with. With lots of computing help from my colleague Todd (who blogs at "Talking Physics"), we had the ability to collect and analyze lots of spatial data. The big question was "how do we scan the stream table?"
Our first design was a kind of "roller skate" frame that traversed the entire length of the stream table. There were lots of things that worked with this design, but we ended up having trouble matching subsequent scans. There's still lots of potential, but we didn't have the time needed to to the matching.


The scans from the "roller" worked pretty well, but they were sometimes distorted. Comparisons between separate scans were also difficult to line up.

So we went with a "locked down" setup for the scanner. To keep the precision of the short distance for the scanner, we were limited to a narrower view of the stream table. This let us directly compare individual scans to study changes over time (or from changes in discharge, etc.).

Here's the setup with the kinect and time-lapse camera set up to record movies and spatial data simultaneously.

Here's a quick example of what we've done so far (click to embiggen).


Kinect scanners are sold separately for about $150 or so. I got mine used at a game store for about $70. Don't forget to pick up a power supply (which comes with the USB cable that will interface with the computer).

Some software that we've used:
Meshlab: for viewing the point cloud data
RGBDemo: for making quick 3D surfaces
OpenKinect: Information about grabbing the 3D data
To process the raw data, Todd combined the distance file data using a Python script (running on a Linux box) and then compared the averaged distance values from one scan to another.