Friday, September 30, 2011

Friday Catblogging

For Kelly:

I am apparently displeased with your lack of progress.


What's that you say?


I am here to put you back on schedule.


Oh noes.

Wednesday, September 28, 2011

New blog with 50% more kitteh

There's a new blog, Geokittehs. Eponymous blog is eponymous.


Birke cat approves, but says it needs more string.

Thurs-Demo: The one that goes boom

It's Thursday. That means another demo. This week, I've been stricken with one of the various plagues that burns through college campuses at the start of the semester. All these viruses with thousands of brand new vectors. It's like some kind of frickin' holiday for them, or something. But since I was producing almost as much mucous as a netted hagfish, I didn't create a new demo this week. But, I have put together a little more information behind a demo I did last fall.


This demo came from an article and web page done by one of my former professors. Their write-up is well detailed and documented, so I'm not going to add much to what's in the journal article. If you really want to do this demo yourself, read what I have to say about my experience and then go read what Harpp et alia have to say. Pay special attention to the safety info. If you've never handled liquid nitrogen (LN2), you really want to pay attention. The stuff can be fun to experiment with, but only if handled safely.

I have embedded the video mashups from our demo runs below. Some things to look for include:

  • Our first attempt exploded almost immediately. To make the bottle sink to the bottom, we poured it about 2/3 full of sand. This reduced the available gas volume and forced the bottle to burst too quickly.


  • One attempt just sank to the bottom and then bubbled out. This was because I placed a "tall" cap on a "short-stem" bottle. Pay attention to this - some bottles have a shorter threaded neck and the taller caps won't seal properly.


  • If you experiment with larger or smaller bottles, be sure that there is enough weight attached to the bottle. One of the runs shows the top of a bottle poking out of the water. This isn't very safe, because if you can see the bottle, there's nothing between you and a bursting pop bottle. The explosion was very loud. Fortunately, the bottle failed in a way that propelled it up into the air about 50 feet. Quite impressive, but loud and a little more hazardous than you want for an audience.


  • The article suggests placing "ejecta" into the barrel. We tried practice golf balls. Ultimately, the surface we used was too uneven to allow for post-eruption particle tracking, but this has some interesting potential for enriching the demo with additional learning outcomes (plus, it gives students something to do while you're refilling the garbage can). I want to grab some whiffle balls of baseball and softball size and add them to the barrel. But you'll really need enough to completely cover the surface of the water, otherwise there won't really be much to see. As an added bonus, you can use the balls for particle tracking and estimate speed and size of the eruption column.


  • I concur with Harpp et al. in their recommendations for a heavy-duty style, plastic garbage can. There's too much flexing and pressure to use metal or thin plastic, unless a burst and laterally-directed blast is what you want. I've used one of these garbage cans for about 10 explosions and it seems fine. The downward pressure does push the can into the ground, so avoid having sharp rocks or something like that underneath the container. They might puncture the can.


  • Finally, go beyond the "big bang" and think about the physics behind this demo. Grab your ideal gas law and video tracking software. These demos used "about" 50 mL of LN2 for each explosion (the boiling LN2 makes it hard to get a real good estimate). And the can is the 32 gal size (filled with about 30-32 gal. of water each time). We can estimate height of the water column (and its approximate center of mass) and the time it took to get there.

  • Some questions to consider:


    • How much energy was released in the explosion

    • Why does the garbage bin jump upward? Is it rebounding of the explosive force, or friction from the water moving upward, dragging the bin up with it?

    • How could we rig the demo to create the largest possible eruption? (In our first series of tests, there didn't seem to be any obvious difference in column height between a 20 oz (0.6 L) bottle and a 2 L bottle.


Okay, enough thinking. On to the explosions!


Friday, September 23, 2011

Thinking is hard...


I've been grappling with fluvial theories for the last few months. I think I have an idea for what my field area is doing, but it's not simple. It's very complex. It might be more complex than I imagine. Or maybe there's a simple answer staring me in the face. This is one reason why I like the web and conferences. It's a chance to bounce ideas off others and see what sticks.

Thursday, September 22, 2011

Thurs-Demo: The one that sooths

Okay, today's demo is just an illustration of what you can do with a handful of plasma globes and a couple of mirrors. Nothing fancy, just something to set the mood before we blow stuff up...

Plasma_1603

Plasma from Matt Kuchta on Vimeo.

Wednesday, September 21, 2011

Only Ninth?

A recent search term that found my blog said the term was the ninth on the list.


Only nine? I guess I'll have to write up some more stuff about snails...

Monday, September 19, 2011

What is a "Proxy?"

It may not be what you think it is. Greg Laden has a great example of how we are all bound by the same rules of assumption when it comes to "science-you-don't-like" and daily life.

Opportunities...

This weekend, I was planning on helping out with a photo-shoot. My pal Kelly McCullough was to reprise his role as Mr. Tumnus and the amazing photographer Kyle Cassidy was going to take some pictures. You can tell these are pretty hip cats, since their names are also URLs. Since Kyle was flying in for the shoot, he didn't have a whole studio's worth of lighting with him, so I had some of my equipment ready to provide some illumination. Unfortunately, schedules and weather conspired against us, so we didn't get around to it.

Last February, we trudged into the woods to capture some photos, which served as the inspiration for the planned shoot:
L&K_7163

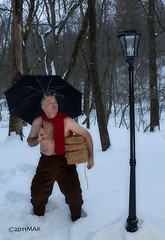
In my effort to prep for additional shots and make use of some different lighting techniques, I built myself a "strip light." Basically a long tube that projects the camera flash over a larger area (in one dimension). The result is softer shadows along the long-axis of the light, but harder shadows (and thus definition of forms) in the other direction. There are several good online tutorials, but they all suffer from the same basic problem - they aren't easy to throw around in the field.

In the interest of something I could mount and use outside (in decent weather), I cobbled a flash mod with tagboard, wood dowels, foil tape, binder clips, plastic sheet, and velcro.

FlashRig_7337
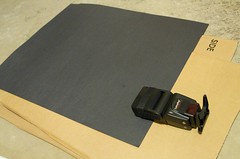
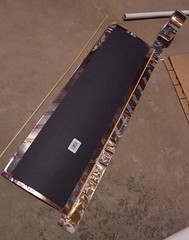
Laying out the cardboard and flash for trimming to the right width.

FlashRig_7339
Trimmed cardboard and flash. I went with a strip just under three feet in length (based on other DIY projects, this is about as long as the flash can easily handle before too much light is lost. The inside face of the cardboard is covered with foil tape (for maximizing internal reflection).


FlashRig_7340
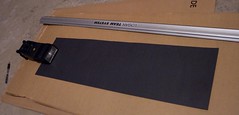
The key is to tape dowels along the edges - this adds rigidity, but also serves as a little "lip" on which to clip the plastic diffuser.

FlashRig_7344
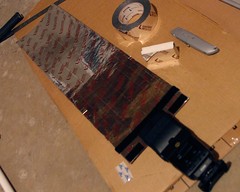
The front side, with velcro tape - this adheres to the velcro strap I placed around the edge of the flash. The small foil-wrapped block is the top piece - I wrapped this in velcro and it holds the top of the cardboard into shape and keeps light from spilling out the top.

_MG_1551
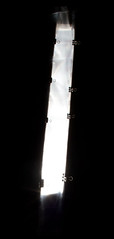
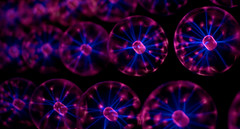
I stretched a piece of plastic across the front. This helps hold the cardboard in place and diffuses the light coming out onto the subject so that the shadows are softer. Here's a photo of how the light fills the strip - full blowout almost to the very top - the effective "size" of the light source is now much larger.


_MG_1557
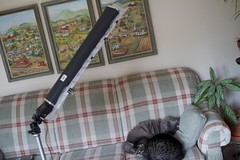
This thing is pretty light - you can mount the whole thing on a camera - but it's rather unwieldy. Mounting the flash off-camera makes things a little simpler, plus I can position the flash rig and adjust where the shadows fall (provided your subject isn't moving around too much).


_MG_1563
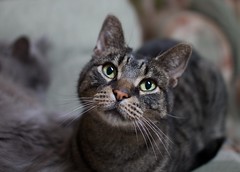
And the finished product - it's not the most glamorous photo in the world, but it adds an interesting highlight to the eye, plus fills in the shadows and creates some nice even light across the subject.

There's some cool physics/optics involved here. But, for you geology types, imagine that you have a large specimen you want photographed. Photographing it in sunlight, or with a bare flash will produce lots of sharp shadow edges. Some of these are nice - they help define structures and textures. But in some cases, they also get in the way. By controlling the light, you can control how the light defines the shape of the object. Best part: total cost of materials was less than about $10 ($5 if you don't count the velcro or binder clips).

Arr me hearties

So, my scurvy readers. This be "Talk Like A Pirate Day" and all hands should be scampering above decks, belching forth speech that'd make yer mum faint.

Here be some data to fuel yer privateering.

The barometric pressure were well high and mighty over the weekend, but today the pressure has dropped like a berk off the plank. Me eyeballs are popping out of their sockets like a right load of grapeshot. Ow.

Thursday, September 15, 2011

An isotropic mineral in crossed polars for Callan

Callan Bentley asked me for my image of an isotropic mineral in crossed polars:


Oh the funny, it hurts.

Thurs-Demo: The one with cleavage

Our department is getting a high-speed video camera. This alone is way-cool. However, while testing out some of the capabilities, it occurred to me that I might be able to use it to demonstrate how some minerals fracture along specific planes of weakness within the crystal. So, to try it out, I took a small calcite crystal and squished it with a pair of pliers.

Mineral Cleavage Test from Matt Kuchta on Vimeo.


It's not perfect - the frame rate (about 3,000 fps) isn't quite fast enough to capture subtle changes just prior to breaking, but it does show off plenty of tiny rhombohedral cleavage fragments spinning off as it breaks. This is one of those demos that is cheap to set up, but filming it requires the use of a rather expensive piece of equipment. But, oh is it pretty...

Wednesday, September 14, 2011

Connecting the dots.

I've been working on my presentation for GSA - which is part of my developing research into the fluvial geomorphology of the Red Cedar River in western Wisconsin. The picture below represents some of what's occupying my mind right now. The dots represent the elevation of stream terrace surfaces along the river valley. The y-axis is elevation in feet above sea level and the x-axis is horizontal distance (in meters) measured from the mouth of the Red Cedar River. I obtained the measurements in GIS, getting the elevations from a LiDar dataset and using the "measure" tool to get horizontal distance. The orange and green lines represent some possible interpretations for correlating the different terrace surfaces.


You can see that the two interpretations are quite different in some aspects. The orange lines are my primary interpretation - I focused on emphasizing terrace elevations that were parallel with each other. But, while it's tempting to correlate terraces so that they are parallel with the modern stream profile (blue dots at the bottom), this may not be the case. So, as an exercise in "changing my perspective," I drew the green lines by "squishing" the plot horizontally (extreme vertical exaggeration). This emphasized the possible surfaces that were not parallel.

Those of you with some training in fluvial geomorphology may have noticed another interesting feature. The sheer number of terraces along a 20 km reach of a relatively small river. I have probably over-interpreted some of this data; fourteen terraces, some separated by only six feet is probably the high-end estimate. Even with a more "conservative" correlation, there are at least eight terraces along this stretch of river. I'll let further exploration of that point (as well as my take-home message about the terrace profiles) wait until GSA - if you want to get the full story, come to my talk on Tuesday afternoon.

Gould's belated, posthumous birthday

I didn't realize that the 10th was Stephen Jay Gould's birthday. He would have been 70 years old. I wish I could have met him in person. He was one of the first popularizers of evolution that I read when I was growing up. He was my advisor's advisor - so I am, in a hierarchical academic sense, his grand-advisee.

Jerry Coyne has a wonderful discussion of Gould and his work. Go read it, you'll be glad you did.

Thursday, September 08, 2011

Okay, one more: Catblogging


One of our cats has decided to strike his "sexy" pose this evening. He knows no modesty.

Making use of Available Data (Frac Sand in western WI)

I mentioned earlier that the WGNHS released some of their bedrock geology maps as GIS layers. I suspect that the recent increase in silica sand mining and exploration (typically used in petroleum production during "fracking"). This also means that us research/teaching geologists have access to some handy visualization materials:


Western Wisconsin, view is to the Northeast, up the Trempealeau River Valley (bottom middle). Mississippi River valley is along the lower left and the Chippewa River is the yellow colored valley near the top.

I combined the westcentral geology map from the WGNHS with a digital elevation model (DEM), downloaded from the USGS (www.seamless.gov) and used ArcScene to portray the geology map as a 3D surface. The image is a little coarse, but you can see that the higher hills are capped by the blue layers of rock (Ordovician dolomite). One of the most popular sources of silica sands is the Wonewoc formation (Upper Cambrian). The Wonewoc weathers much more readily than the dolomite, so it only forms the low, rounded hills and lower shoulders, below these more resistant "caps."

Many of these "frac sand" mines are either located, or proposed to be located atop the Wonewoc fm - especially where this sandstone is close to the surface and near major transportation corridors (rail & highways). From a cost perspective, this means less digging and removal of overburden plus lower shipping costs (close to cheaper high volume transport). From an environmental perspective, there are some concerns. This sandstone is quite porous - water percolates into the water table rather quickly. Heavy industry also throws stuff into the air. The frac sand mining boom in this region is getting quite a bit of attention. Perhaps I can dive into the issues in more detail, but here's a pretty good overview from Wisconsin Watch (the Wisconsin Center for Investigative Journalism).

Incidentally - see how the Wonewoc is overlain by younger rocks (tan and blue layers) along the Mississippi River Valley? There are a few underground sand mines along the Mississippi - to haul the sand out, they actually drive dump trucks down into the mine tunnel for loading and then drive out loaded on the other side. Crazy.

Thurs-Demo: The one from several years ago

I built this mini-basin a few years ago when I taught a sed strat course:

Wheeler Diagrams from The Mini Basin from Matt Kuchta on Vimeo.


It's based on the Desktop Delta designed and published by Thomas Hickson (University of St. Thomas) - additional info available at the SERC website.

Now that the semester is in full swing, I'll start working up some new demos. The philosophy behind these demos is that 1) they show an interesting/abstract geoscience concept and 2) don't cost too much. Typically, these demos can be made for under $20 (although sometimes I'll trick them out with some additional flapdoodles (like I did with the Earthquake Machine).

Tuesday, September 06, 2011

Curse you, WGNHS!

Sure, wait until AFTER I had scanned and geo-rectified my own paper map to release a high quality PDF and GIS layer of the bedrock geology of western Wisconsin...

Seriously though, this is great stuff! Check out the other maps the Wisconsin Geologic and Natural History Survey has recently made available. I'm drooling all over my keyboard. I suspect there have been a lot of questions to the survey about silica sand as an economic resource. I think it's great that the survey has provided the public with this kind of information.